Vermicomposting with an In-Ground Worm Bin in a Raised Garden Bed
8/2/20253 min read

If you love gardening, you probably already know that worm castings are like gold for your plants — packed with nutrients and beneficial microbes. But here’s the question: instead of hauling castings from a separate bin, what if you could make them right where your plants need them most?
With an in-ground worm bin, you’ll have a steady supply of worm castings right where your plants are growing. No hauling, no mess, and no extra work. Just healthier soil and stronger plants, season after season.
Getting Started: What You’ll Need
Setting up an in-ground worm bin is simple, and most of the materials are things you may already have around the house or garden. For bedding, you can use shredded newspaper, cardboard, coconut coir, or even shredded leaves. Red wigglers are the worms of choice because they thrive in composting environments and quickly break down organic matter.
For food, your kitchen and yard will provide plenty of options. Vegetable peels, fruit scraps, coffee grounds, and lawn clippings all make excellent worm food. The only other item you’ll need is a container — and for convenience, you can use an in-ground worm bin available from Redworm Depot’s Store.
How to Set Up Your In-Ground Worm Bin
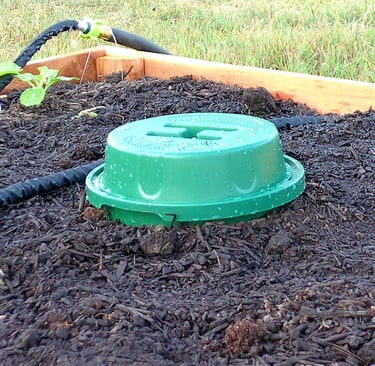
The setup process is straightforward and only takes a few steps. Start by digging a hole in your raised bed in a sunny or partly shaded spot. The hole should be just large enough to securely hold your container. Once the hole is ready, install the bin so that the rim sits just above the soil line. This makes it easy to add food scraps while preventing soil from washing into the bin.
Next, add your bedding material. Moisten it slightly and place it inside the bin, along with a handful of sand or garden soil to provide grit for the worms. With the bedding ready, it’s time to add the worms. Introduce your red wigglers to the bin, and they’ll quickly make themselves at home.
Once the worms are settled, add your first layer of food scraps and cover it with dry bedding. This helps reduce odors and keeps pests away. Place the lid on the container to keep everything secure, and your in-ground composting system is ready to go.
From there, maintaining the bin is easy. Once a week, lift the lid and add new food scraps under a thin layer of dry bedding. Avoid meat, dairy, or oily foods, since these can cause problems. Over time, your bin will fill with rich, dark compost. When it does, remove the lid and scoop out the finished worm castings from the top. The worms will naturally move deeper into the bin to avoid light, making harvesting simple. Then, just add fresh bedding and continue the cycle.
Why Use an In-Ground Worm Bin?
The benefits of this method go far beyond convenience. Worm castings are a slow-release, nutrient-rich fertilizer that’s loaded with beneficial microbes. They improve plant growth, boost yields, and contribute to healthier soil overall.
Worm activity also naturally aerates the soil, improving drainage and water retention in your raised bed. On top of that, worm castings have been shown to help protect plants from soilborne diseases and even deter certain pests.
And perhaps the biggest advantage is the simplicity. Instead of hauling food scraps to a separate compost bin and then moving finished compost back into your garden, you can compost directly in place. Your raised bed becomes both the composting system and the growing environment.
Final Thoughts
Vermicomposting with an in-ground worm bin is one of the easiest ways to boost the health of your raised garden beds. With just a small investment of time and materials, you’ll reduce kitchen waste, produce your own natural fertilizer, and create the perfect environment for strong, thriving plants — all thanks to the hardworking red wigglers in your soil.
👉 Ready to give it a try? Pick up your in-ground worm bin from Redworm Depot’s Store today and start transforming your raised beds into living compost systems.